Introduction
A while back I initiated a thread and asked if anyone would be interested in learning how to code. I spent a little time catching up with some of you and figured it was worth the effort. I’m hoping we can all learn a little something from this experience…
The ultimate goal is to have you scrape stock data from the WSJ and push it to a public google spreadsheet. Along the way, I’ll incorporate various ways for us to track your progress.
This is a self-guided “mini-course”, so do it at your leisure, but try and stick to a deadline. Hopefully, this demonstrates the power of what you can do with tech - primarily the ability to pull in data from a public source, perform some kind of analysis, and push it back out for public consumption. Neat.
The goal of this first lesson is to establish your “development toolbelt”. The tools we’ll be using are standard in technical professions: Github, Sublime Text (or any note editor), and a Command Line (windows) / Terminal (pc). There are some setup differences between operating systems, which is mostly out of bounds for this tutorial - you’ll need to supplement with online research to get your environment going, but I’ll provide the basics.
Setting Up Github
Github is a place to store your code. This tool automatically manages different versions of your code as it changes. This is important b/c business requirements change all the time - by storing versions, we can ensure that if we had to revert back to old code, we could. Essentially, as we develop code in chunks, we’ll “commit” our code to Github each time. This creates a reference to historcal code edits (called commits). This basically solves the whole, “hey, what’s the latest excel version we all used??”.
Another use case is collaboration with others on a piece of code. Github is really good at helping you integrate code changes with others - I’m hoping we can explore that as well, so you can see what a great collaborative tool it can be.
Step 1: Create a Github account here: https://github.com/join
Once you sign up, let’s get our hands dirty in a terminal / command line prompt. Git (the underlying tech driving Github, has what’s called a “command line interface” (CLI) that allows you to interface with your Github repositories (where we will store our code).
In order for you to run “git commands” you’ll need to install the git commands to your computer.
Step 2: Install Git Instructions: https://gist.github.com/derhuerst/1b15ff4652a867391f03
This tutorial is asking you to open your terminal and run a few commands. Once git is installed, you should close your terminal prompt and open it back up so the system can pick up git. You can test if it was installed by typing “git”. This should respond with usage instructions. Congrats you have git installed on your system! Now the fun part.
Step 3: Fork the code repository: https://github.com/bvallier/wsj-scrape-tut
Click on the link above and you’ll see a fork button at the top. Click on it. This replicates the WSJ codebase into your github account. This is an exact replica of the code at that point in time.

Now, let’s setup a place on your desktop or folder of choice for your code. Try and run one of the following:
cd ~/Desktop
mkdir code
cd code
or if you are on windows, something like:
cd c:\Users\username\Desktop
mkdir code
cd code
Make sure to replace your computer’s alias name for “username”. The “cd” command is short for “change directory” and allows you to basically move from one folder to whatever folder you specify. “mkdir” allows you to create a directory. By executing the commands above you have navigated into the folder. You are ready to download our code to this folder.
On Github, click on the “clone or download” link in forked repo, which looks like:
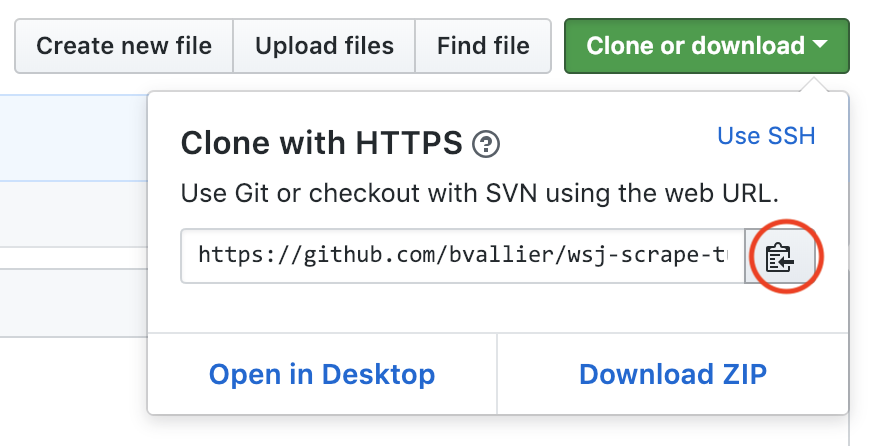
That copies the link of the repository, which you’ll need to run in the next step:
git clone https://github.com/bvallier/wsj-scrape-tut.git .Make sure to clone the url you copied, instead of mine above - you get the idea. Once it looks like you’ve successfully cloned the app locally, we’re ready to make some changes to the code. Open up the project root folder in your favorite code editor. I like Sublime Text, but there’s lots of options. You should see a project directory on the left sidebar. Select the README.md - I have a special message for you.
From here, you’ll need to follow the directions in the README file. Once you are done with that, save the file and head back to the terminal/prompt. We’ll commit the changes and push back to your forked repository:
git add -A
git commit -m "added a nice message"
git push
If you want, you can change your “commit message” by changing the quoted text above. You’ll be prompted to enter your user / pass for github potentially. Follow the directions in the terminal. Once you push, you’ll see the changes in your repository on github. I encourage you to look at how Github tracks the changes.
Ready to really show off your skills? This part is cool - you will officially become an open source contributor. You’ll now merge your code update to the original code base I created, by generating a pull request - I’d write out instructions, but the following link is a pretty good reference. Follow the instructions here:
https://help.github.com/articles/creating-a-pull-request-from-a-fork/
Once you add the pull request (PR) I’ll merge the code (if everything looks good, of course :)) and everyone who starts this tutorial after I merge your PR will see your special message. Coool.
That’s it, you’re officially an open-source contributor.
All of this is being done in preparation for the web scraping task in our next tutorial, so keep up! Please share, comment, upvote as you needed. I’ll respond to comments / questions, etc. If something is unclear, comment. See you soon.